
triton t80 easi-fit installation manual
Welcome to the Triton T80 Easi-Fit installation manual, your comprehensive guide for successful installation. This manual is essential for installers and users, ensuring safety and optimal performance.
1.1 Overview of the Triton T80 Easi-Fit Electric Shower
The Triton T80 Easi-Fit is a high-quality electric shower designed for easy installation and user convenience. It features multiple cable and water entry points, ensuring flexibility during fitting. With its sleek design and advanced controls, it offers a reliable and efficient showering experience. This manual provides detailed instructions to ensure proper installation, operation, and maintenance of the unit.
1.2 Importance of Following the Installation Manual
Adhering to the Triton T80 Easi-Fit manual ensures a safe and efficient installation. Proper compliance with the guidelines guarantees optimal performance and longevity of the shower. Deviating from the instructions may lead to safety hazards, void the warranty, or result in improper functionality. The manual is your comprehensive guide, covering all essential steps and precautions for a successful setup. Follow it carefully to ensure reliability and satisfaction.
Safety Guidelines and Precautions
Safety is paramount during Triton T80 Easi-Fit installation. Ensure installation by a qualified professional and comply with all guidelines. Use genuine parts to avoid warranty issues.
2.1 General Safety Notes for Electric Shower Installation
Ensure installation is carried out by a qualified professional. Always follow Triton’s guidelines to avoid hazards. Use genuine parts to maintain warranty and safety. Keep the manual for future reference, and ensure all electrical and plumbing connections meet local regulations. Failure to comply may result in unsafe operation or damage to the unit. Proper installation ensures long-term reliability and user safety.
2.2 EC Registered Design and Patents Pending Information
The Triton T80 Easi-Fit is an EC Registered Design (No. 001902388-0005 to 0007) and has patents pending (GB 2489547, GB 2495343). This design is protected under European regulations, ensuring quality and innovation. Using genuine Triton parts is essential to maintain compliance and warranty validity. The product’s design and functionality are safeguarded by these registrations, ensuring reliability and safety for users.
Tools and Materials Required for Installation
Ensure you have all necessary tools and materials, including a screwdriver, drill, wrench, and genuine Triton parts, to complete the installation successfully and safely.
3.1 List of Tools Needed for the Installation Process
- A screwdriver (both flathead and Phillips) for removing screws.
- A drill with appropriate drill bits for wall fixing.
- A wrench or spanner for connections.
- Pliers for gripping small components.
- A spirit level to ensure proper alignment.
- Wall plugs and screws for securing the unit.
- PTFE tape for sealing pipe connections.
- Genuine Triton parts for compatibility and safety.
3.2 Genuine Triton Parts and Their Significance
Using genuine Triton parts ensures compatibility, safety, and optimal performance. These parts are specifically designed for the T80 Easi-Fit, guaranteeing a secure and reliable installation. Genuine components prevent potential risks of leaks or electrical issues. Always verify the authenticity of parts to maintain warranty validity and ensure compliance with EC design registrations and patents pending. Failure to use genuine parts may invalidate your guarantee and compromise safety standards.
Installation Steps for the Triton T80 Easi-Fit
Follow the step-by-step guide for installing the Triton T80 Easi-Fit, ensuring proper fitting, electrical connections, and water entry points for a safe and efficient setup.
4.1 Pre-Installation Checks and Preparation
Before starting, ensure you are a qualified installer and have read the manual thoroughly. Verify the shower’s compatibility with your electrical and plumbing systems. Check for any damage to the unit and ensure all genuine Triton parts are included. Isolate the power supply and water connections before commencing work. Familiarize yourself with the EC Registered Design and Patents Pending information. Ensure the installation area is clear and meets safety standards for a smooth process.
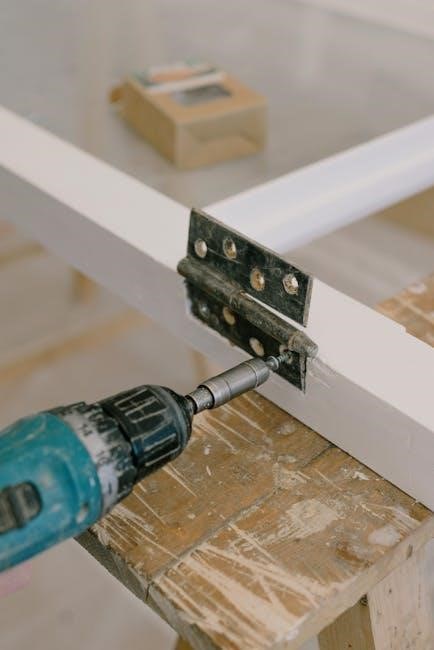
4.2 Step-by-Step Guide to Fitting the Shower Unit
Mount the shower unit on the wall, ensuring it is level and securely fastened. Connect the water supply to the designated inlet, using genuine Triton parts for compatibility. Attach the electrical connections, adhering to safety standards and ensuring they are performed by a qualified professional. Assemble the riser rail, adjusting the wall brackets for proper alignment. Finally, secure the shower head and test all connections before proceeding to the next steps.

Electrical and Plumbing Connections
Connect the shower to a suitable electrical supply and ensure all plumbing connections are secure. Use genuine Triton parts for compatibility and safety, following all guidelines carefully.
5.1 Connecting the Shower to the Electrical Supply
Ensure the electrical supply matches the shower’s specifications. Use genuine Triton parts for compatibility and safety. Connect the wiring carefully, following the manual’s instructions. Double-check all connections for security and integrity. Ensure the installation complies with local electrical regulations and safety standards. Refer to the manual for specific voltage and power requirements to avoid damage or hazards. Proper electrical connection is crucial for safe and efficient operation.
5.2 Plumbing Requirements and Water Entry Points
Ensure correct plumbing connections for proper water supply. The T80 Easi-Fit features multiple water entry points on both sides for flexible installation. Use only genuine Triton parts to maintain compatibility and safety. Connect the water supply securely, following the manual’s guidelines. Regular descaling is recommended to prevent mineral buildup and ensure optimal performance. Always comply with local plumbing regulations and safety standards for a reliable and efficient shower system.

Final Assembly and Testing
Assemble the riser rail and shower head, ensuring all connections are secure. Test the shower for proper water flow and temperature control to confirm functionality and safety.
6.1 Assembling the Riser Rail and Shower Head
Begin by attaching the shower head holder to the riser rail. Twist the holder counter-clockwise to release the locking mechanism, then slide it onto the rail. Secure it firmly to ensure stability. Align the shower head with the holder and twist clockwise to lock it in place. Ensure all connections are tight and properly aligned for optimal water flow. This step is crucial for safe and efficient shower operation.
6.2 Testing the Shower for Proper Functionality
After assembly, turn on the electrical supply and run water through the shower to check for leaks and proper water flow. Ensure the temperature control and flow settings function correctly. Verify that all connections are secure and that the shower head is properly aligned. Test the riser rail’s stability and ensure smooth height adjustment. If any issues arise, refer to the troubleshooting section or consult the manual for guidance. Proper testing ensures safe and efficient operation.

Troubleshooting Common Issues
This section addresses common problems during installation and operation, such as water leaks, uneven heating, or electrical malfunctions. Detailed solutions and diagnostic tips ensure quick resolution, minimizing downtime and ensuring safety. Refer to this guide for step-by-step fixes and maintenance advice to restore optimal functionality.
7.1 Common Problems During Installation
Common issues during installation may include incorrect water entry point alignment, electrical supply mismatches, or improper riser rail assembly. Ensure all connections are secure and aligned properly. Verify electrical supply meets specifications to avoid malfunction. Double-check riser rail brackets for stability. Leaks or poor shower head fit can result from improper assembly. Always follow the manual’s guidance to prevent these issues and ensure a smooth setup.
7.2 Solutions for Ensuring Safe and Efficient Operation
To ensure safe and efficient operation, always use genuine Triton parts and follow installation guidelines. Regularly descale the shower head and check electrical connections. Test the shower after installation to confirm proper functionality. Address leaks promptly by tightening connections. Maintain the riser rail’s stability and ensure water entry points are correctly aligned. Adhere to safety guidelines and manufacturer recommendations for optimal performance and longevity of your Triton T80 Easi-Fit shower.
Maintenance and Care Tips
Regularly descale the shower head and check electrical connections. Use genuine Triton parts to maintain performance. Ensure the riser rail is stable and leak-free for optimal functionality.
8.1 Regular Maintenance for Long-Term Use
Regular maintenance ensures your Triton T80 Easi-Fit operates efficiently. Descale the shower head periodically to prevent mineral buildup. Check electrical connections and water entry points for leaks or damage. Clean the riser rail and ensure all fixings are secure. Using genuine Triton parts guarantees compatibility and maintains performance. Regular upkeep extends the lifespan of your shower and ensures safe, reliable operation. Always refer to the manual for specific care instructions.
8.2 Descaling and Cleaning Recommendations
Descaling the shower head regularly prevents mineral buildup, ensuring optimal water flow. Use a descaling solution as recommended by the manufacturer. Clean the entire unit with a soft cloth and mild detergent, avoiding harsh chemicals. Regularly inspect and clean the riser rail and water entry points. This maintenance ensures efficient performance and extends the product’s lifespan. Always follow the manual’s specific cleaning guidelines for best results.
Additional Resources and Support
Access the PDF manual and online guides for detailed instructions. Watch video tutorials for installation and operation. Visit the official Triton website for comprehensive support resources.
9.1 Accessing the PDF Manual and Online Guides
The PDF manual for the Triton T80 Easi-Fit is available for free download online. Visit the official Triton website or authorized retailers like Argos for the most up-to-date guides. Ensure you download the correct manual for your specific model, such as the TRITON T80 EASI-FIT ELEC SHOWER 9.5KW (850/8690). Additional online guides and video tutorials are also available to assist with installation and troubleshooting. Always use genuine Triton parts for warranty validity.
9.2 Video Tutorials for Installation and Operation
Video tutorials are available online to guide you through the installation and operation of the Triton T80 Easi-Fit. These tutorials provide step-by-step instructions and visual demonstrations, making the process easier to understand. While videos may not cover your exact model, they offer valuable insights into electric shower basics. Triton recommends watching these videos before starting your installation to ensure safety and efficiency. Additionally, videos like the T80 Easi-Fit Plus installation guide highlight features like dial power and temperature controls.
Congratulations! You’ve completed the Triton T80 Easi-Fit installation. This manual provided comprehensive guidance for a safe and efficient setup. Refer to it for future maintenance and troubleshooting.
10.1 Final Checklist for Successful Installation
- Ensure all electrical and plumbing connections are secure and correctly fitted.
- Verify the shower unit is properly mounted and aligned.
- Test the shower for proper water flow and temperature control.
- Check that all safety features are functioning as intended.
- Confirm that genuine Triton parts are used throughout the installation.
- Review the manual to ensure no steps were missed.
- Dispose of packaging responsibly and clean the installation area.
Completion of this checklist ensures a safe and efficient installation of your Triton T80 Easi-Fit electric shower.
Leave a Reply
You must be logged in to post a comment.